
The new Ultra Mod: MAX User Guide is available now!
Original ULTRA MOD User Guide
Welcome to your ULTRA MOD.
Thank you for choosing GadCAD 3D's Unofficial ULTRA MOD for the Pokémon GO Plus +! We appreciate your support and are so excited for you to experience the ultimate auto-catcher.
This guide will help you pair your device, configure your in-game settings to auto-throw Great and Ultra balls, and use the Sleep tracking feature. Let's get started!
Missing out on the fun?
Shop ULTRA MODsCollapsible content
Disclaimers
Read the included operating manual from the original manufacturer for complete device and safety details before use.
GadCAD 3D is an independent operation based in Texas and is NOT affiliated with, endorsed by, or authorized by The Pokémon Company (comprised of Nintendo, Inc., GAME FREAK, Inc., and Creatures, Inc.) Niantic, Inc., nor any of their subsidiaries or affiliates. All product names, logos, and brands mentioned are the property of their respective owners and are used solely for identification purposes.
GadCAD 3D's Unofficial ULTRA MOD for the Pokémon GO Plus+ (henceforth "this service") is designed to automate pre-existing functions of the retail Pokémon GO Plus+ device, such as pressing the button to auto-throw Great or Ultra Balls, which typically require manual operation. This change results from independent innovation and is neither approved nor endorsed by the original manufacturers nor the game's publishers. Utilization of this service is at the user's own discretion and risk. Customers who purchase and/or any individuals who use this service accept that GadCAD 3D shall not be liable for any direct, indirect, incidental, or consequential damages or losses that may occur, nor for any actions that may be taken against the user's gaming account in parallel with its use.
GadCAD 3D shall not be held liable for any compatibility issues that may arise post-purchase. GadCAD 3D does not provide software updates or guarantee ongoing compatibility of the modified devices with mobile phones, operating systems, or the Pokémon GO application. The user is responsible for verifying the compatibility of the Pokémon GO Plus+ with their mobile devices, operating systems, and app versions by referring to the original manufacturer’s specifications and requirements before purchase.
Device Overview
Get to know your ULTRA MOD device.
Click on an item to expand its details
Collapsible content
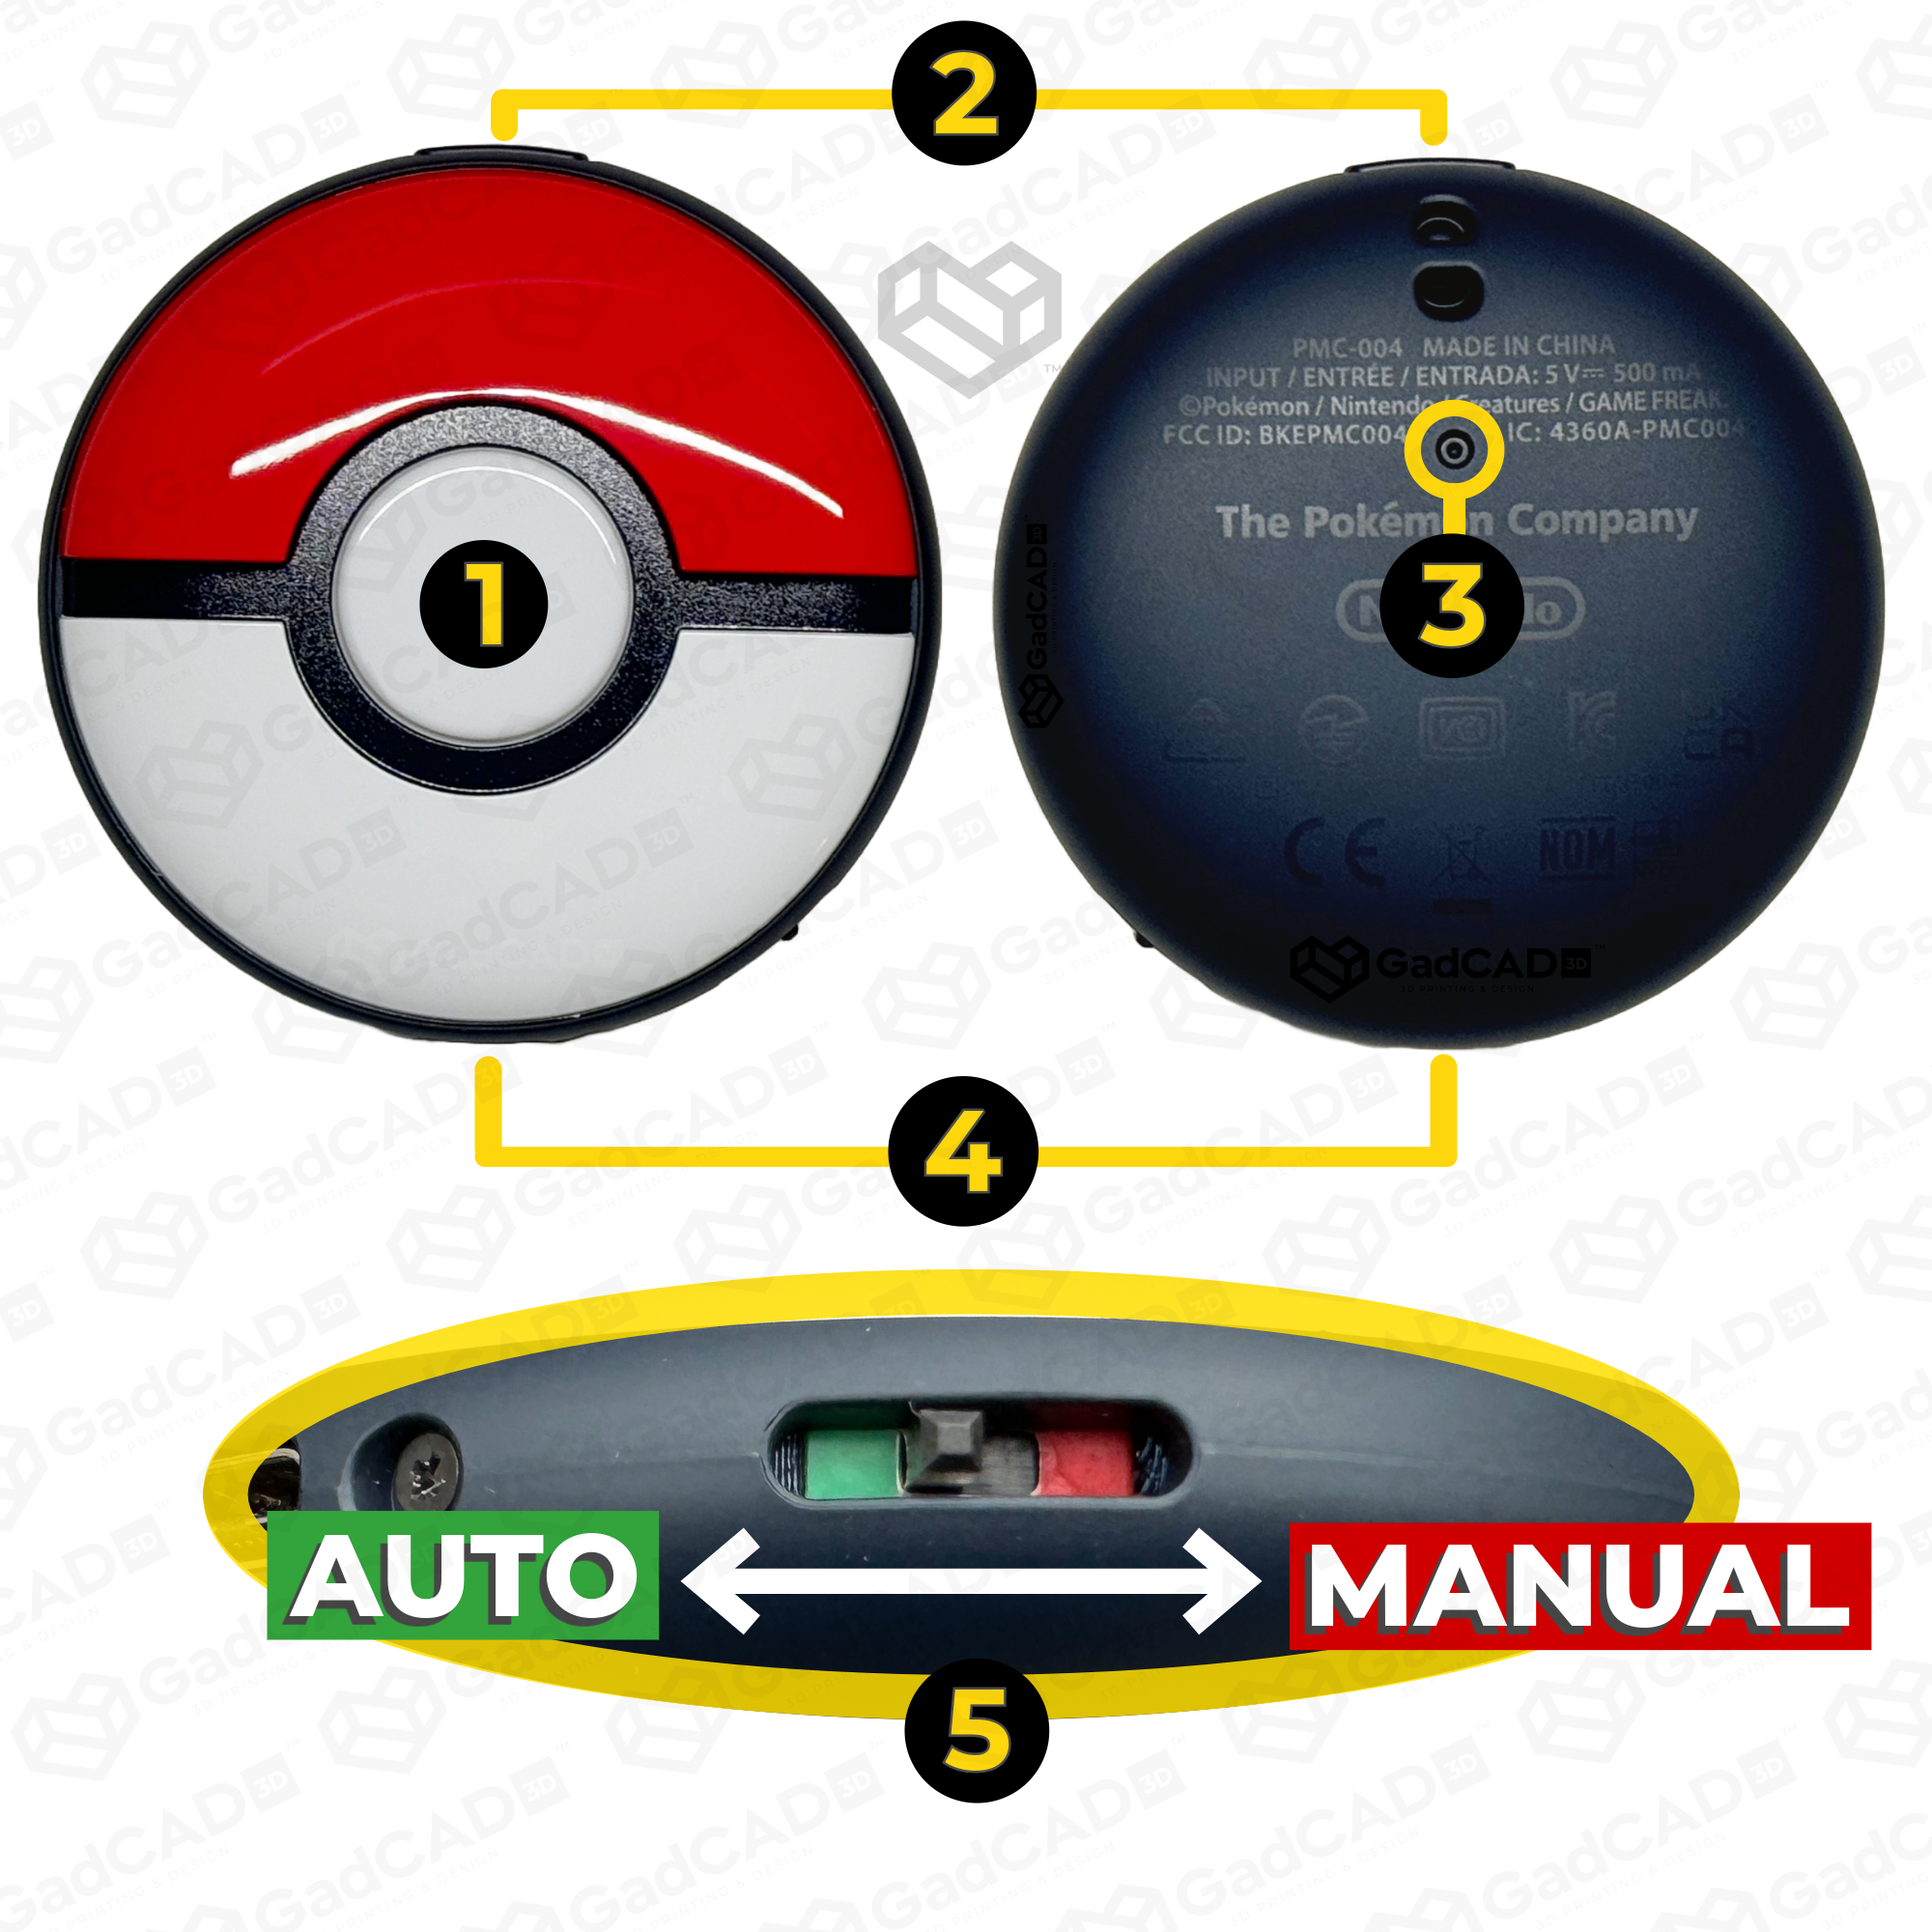
1. Main Button
The primary way to interact with your device. Its LEDs will flash different colors and patterns to communicate various actions as states.
Note: With the Dim version, the backlights may be difficult to see in broad daylight.
2. Side Button
Pressing while unplugged will show the current battery level through the small LED and indicates the charging status while plugged in. Also used for First Time Pairing and Factory Resets.
Battery levels:
- Excellent = Green (solid)
- Fair = Yellow (one blink)
- Low = Yellow (two blinks)
- Critical = Red (blinking)
Charging status:
- Depleted = Red (blinking)
- Charging = Yellow (solid)
- Full = Green (solid)
3. Reset Button
This tiny button can be a big help with random problems. Use the tip of a pen to press it once for a Quick Reset.
For more stubborn issues, try performing a Factory Reset.
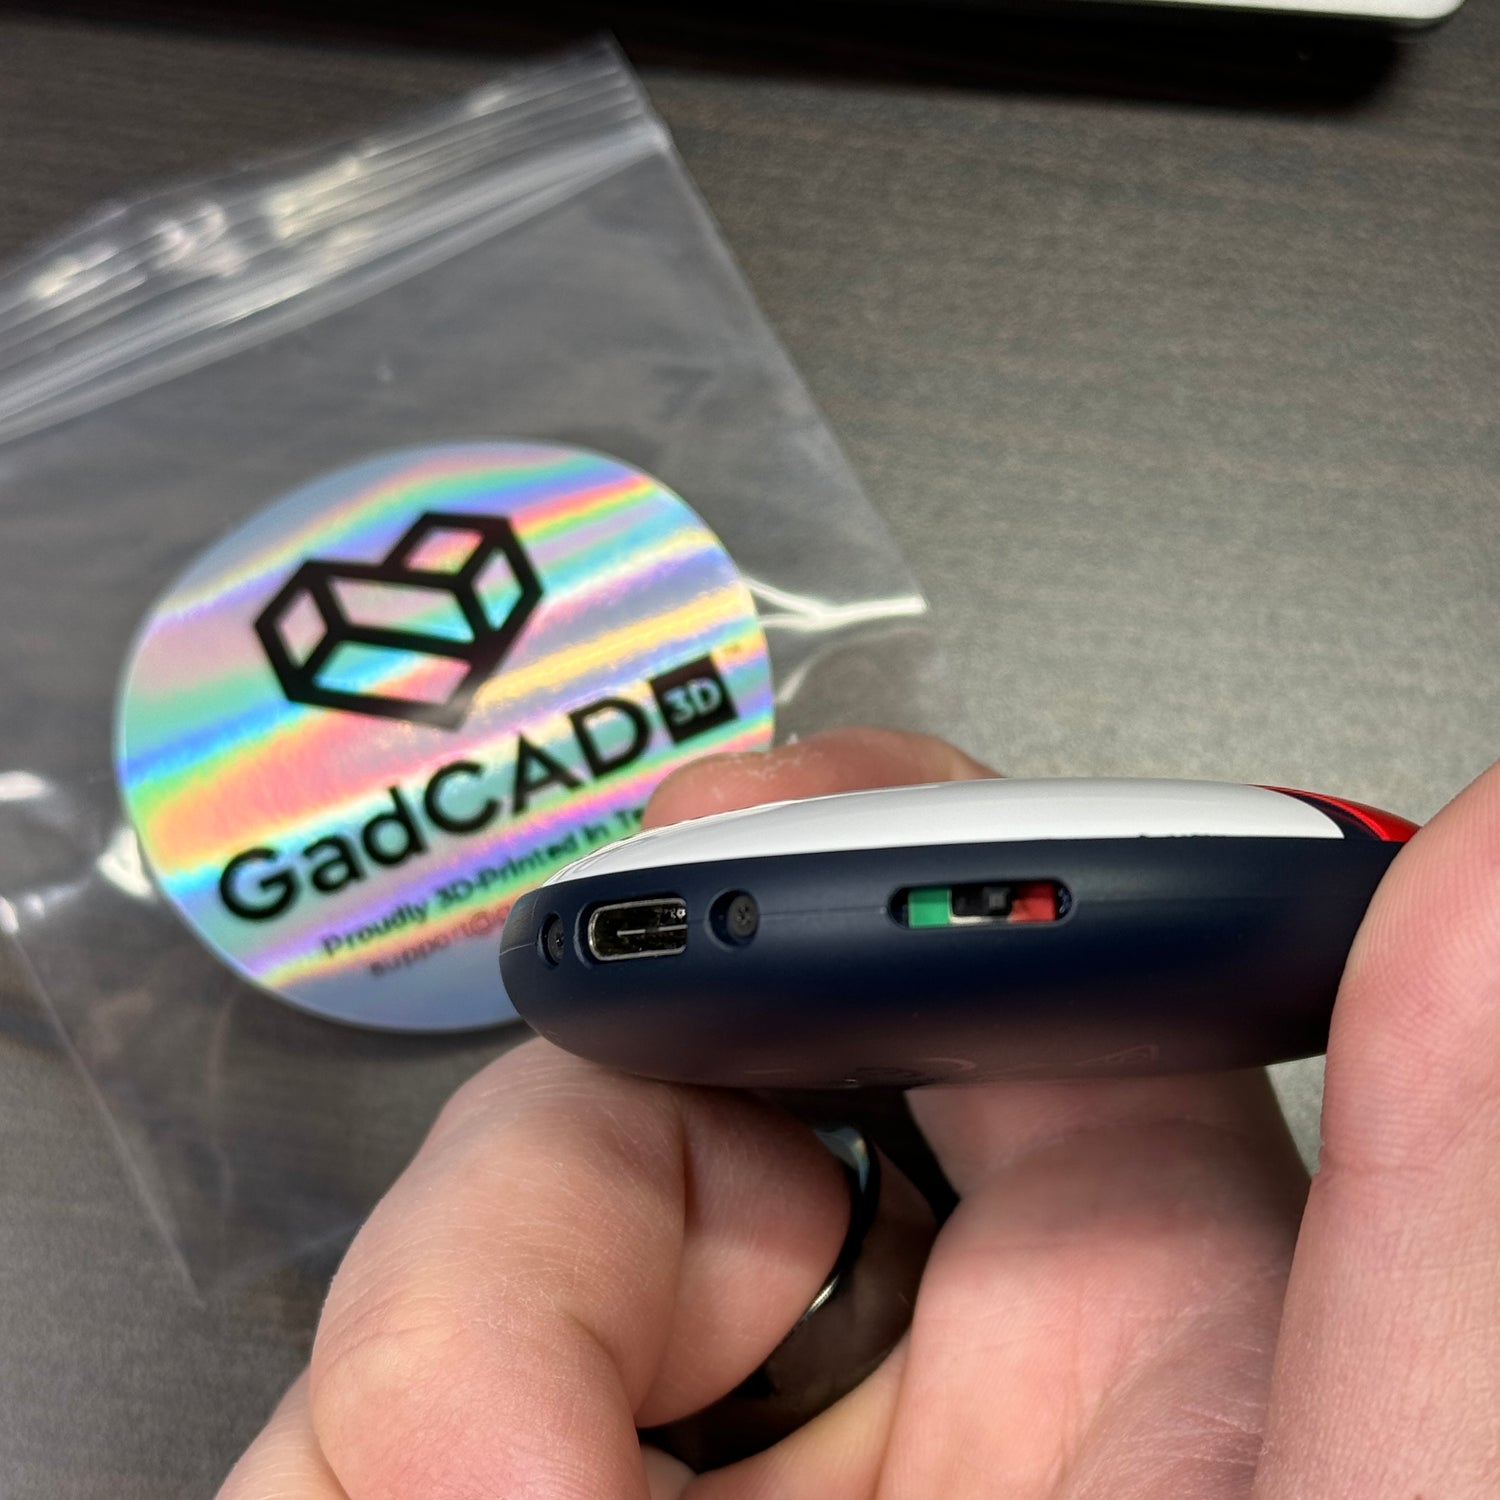
4. Charging Port
Use the included USB-C cable to charge your device for at least 20 minutes before use.
The GO Plus + charges very slowly and can take ~2 hours to reach full charge from empty.
- Max input: 0.25A @ 5V
- Battery size: 500mAh (3.7V)
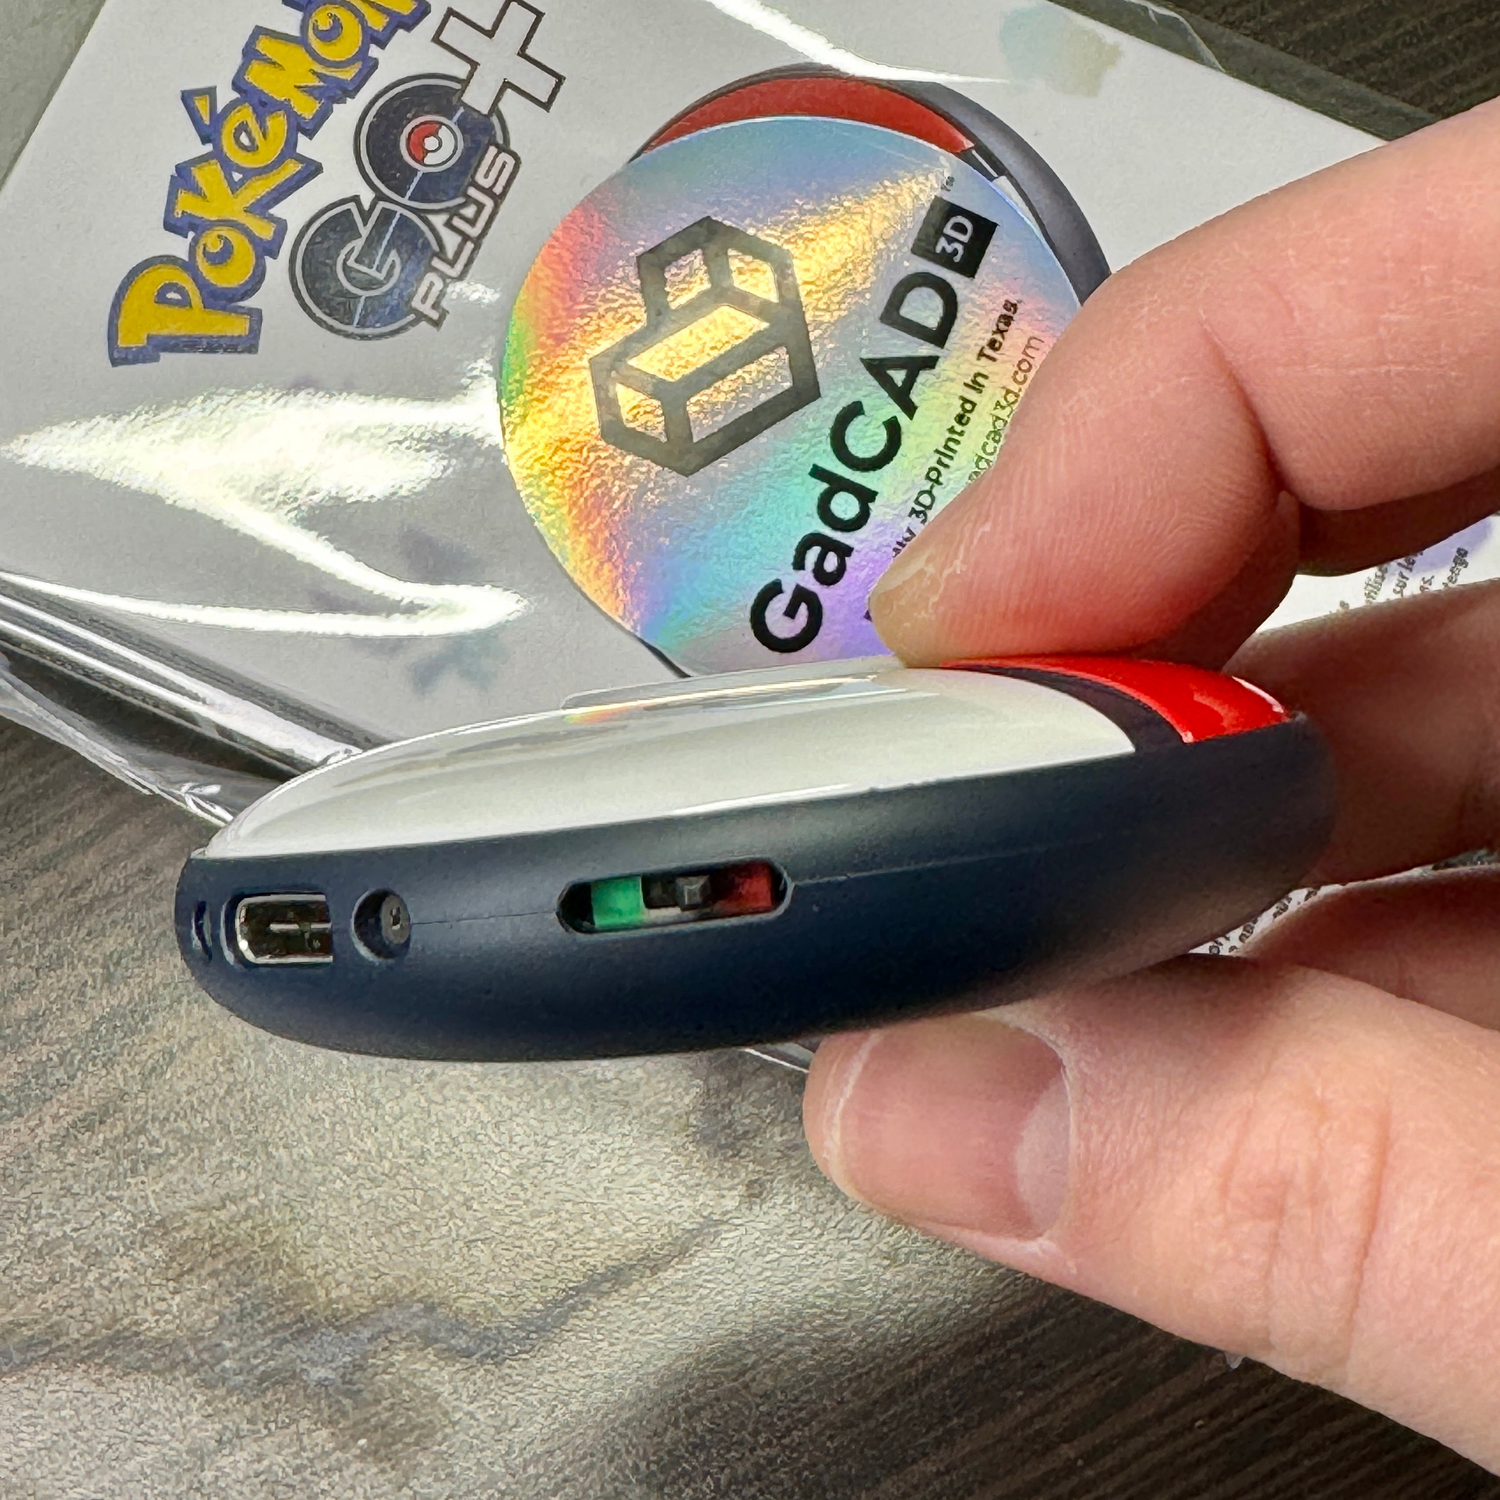
5. ULTRA MOD Switch
The backbone of your ULTRA MOD. This tiny switch helps automate actions that normally require pressing the Main Button (like throwing a Great or Ultra Balls) while still allowing you to track your sleep for in-game rewards!
The green side (toward the Charging Port) sets the ULTRA MOD to AUTO mode, and the red side sets it to MANUAL mode.
First Time Setup
Connect ULTRA MOD to your Pokémon GO app.
Step 1:
Unbox and charge.
Allow the device to charge for at least 20 minutes.
The battery LED must be solid orange to proceed (not flashing red). Full charge may take 2~3 hours form empty.
Step 2:
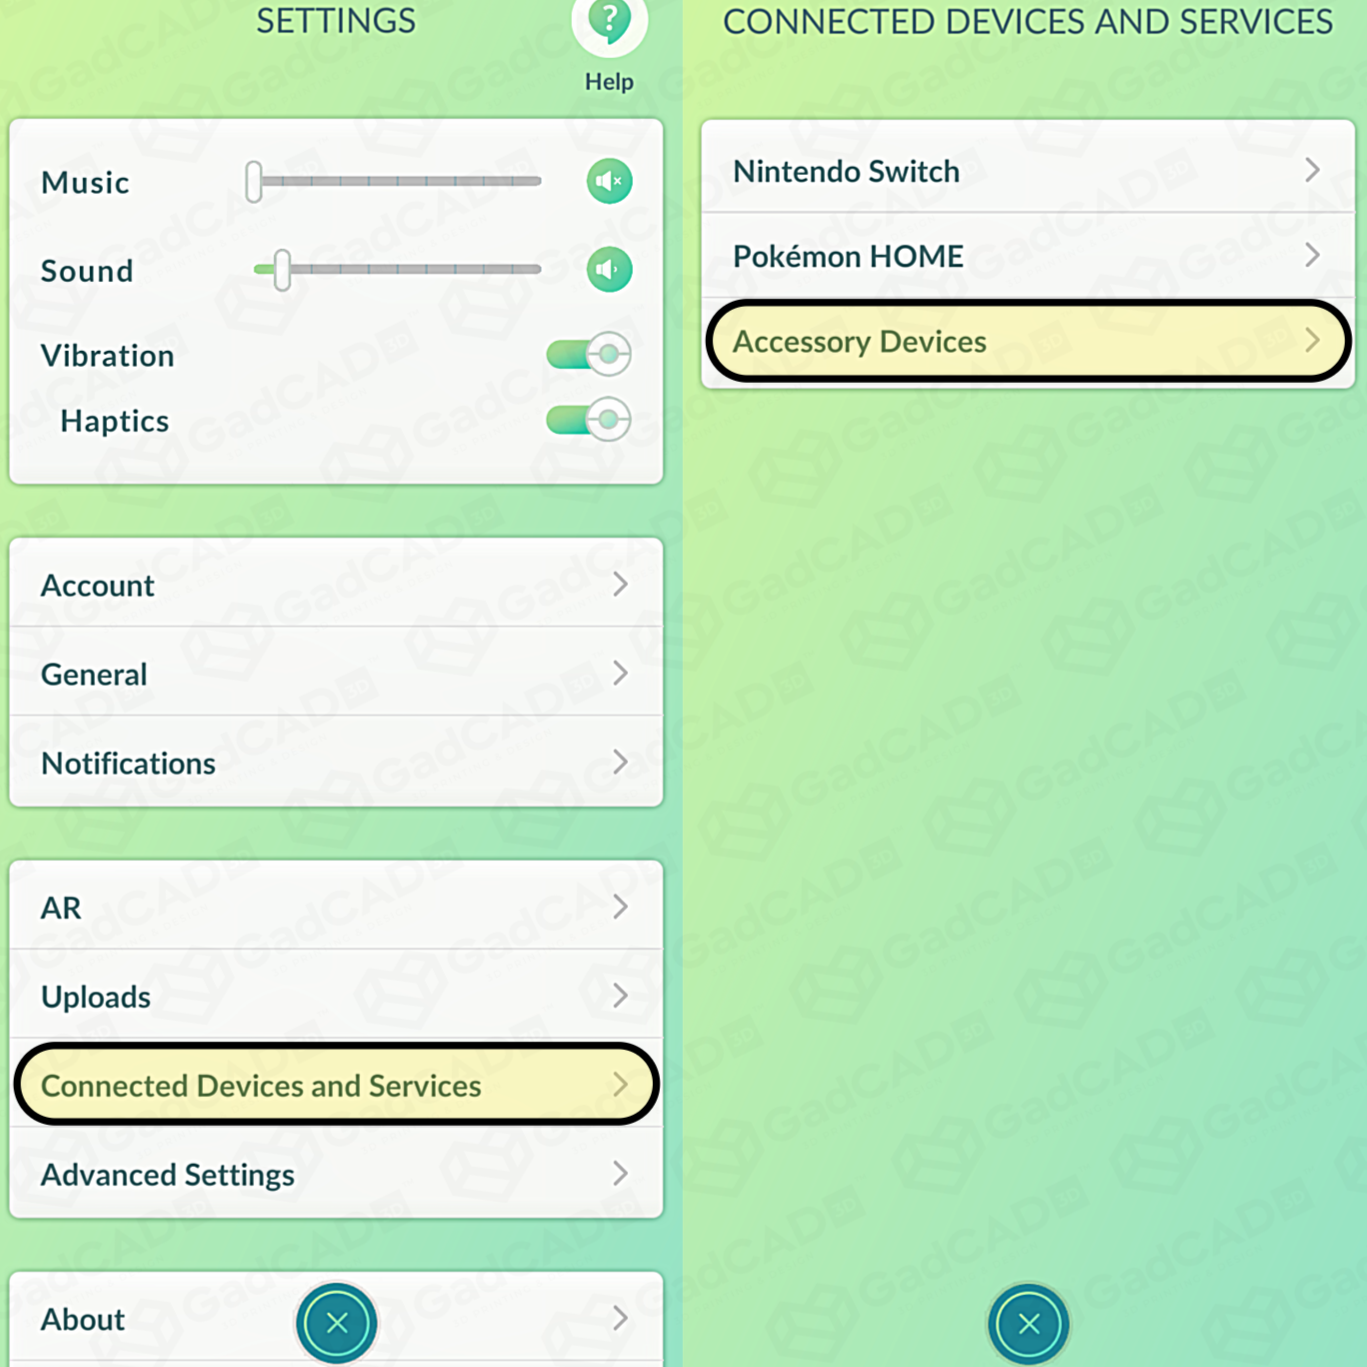
Open Settings.
Ensure Bluetooth is enabled on you mobile device. Launch Pokémon GO and navigate to Settings. From there, select "Connected Devices and Services" and then "Accessory Devices".
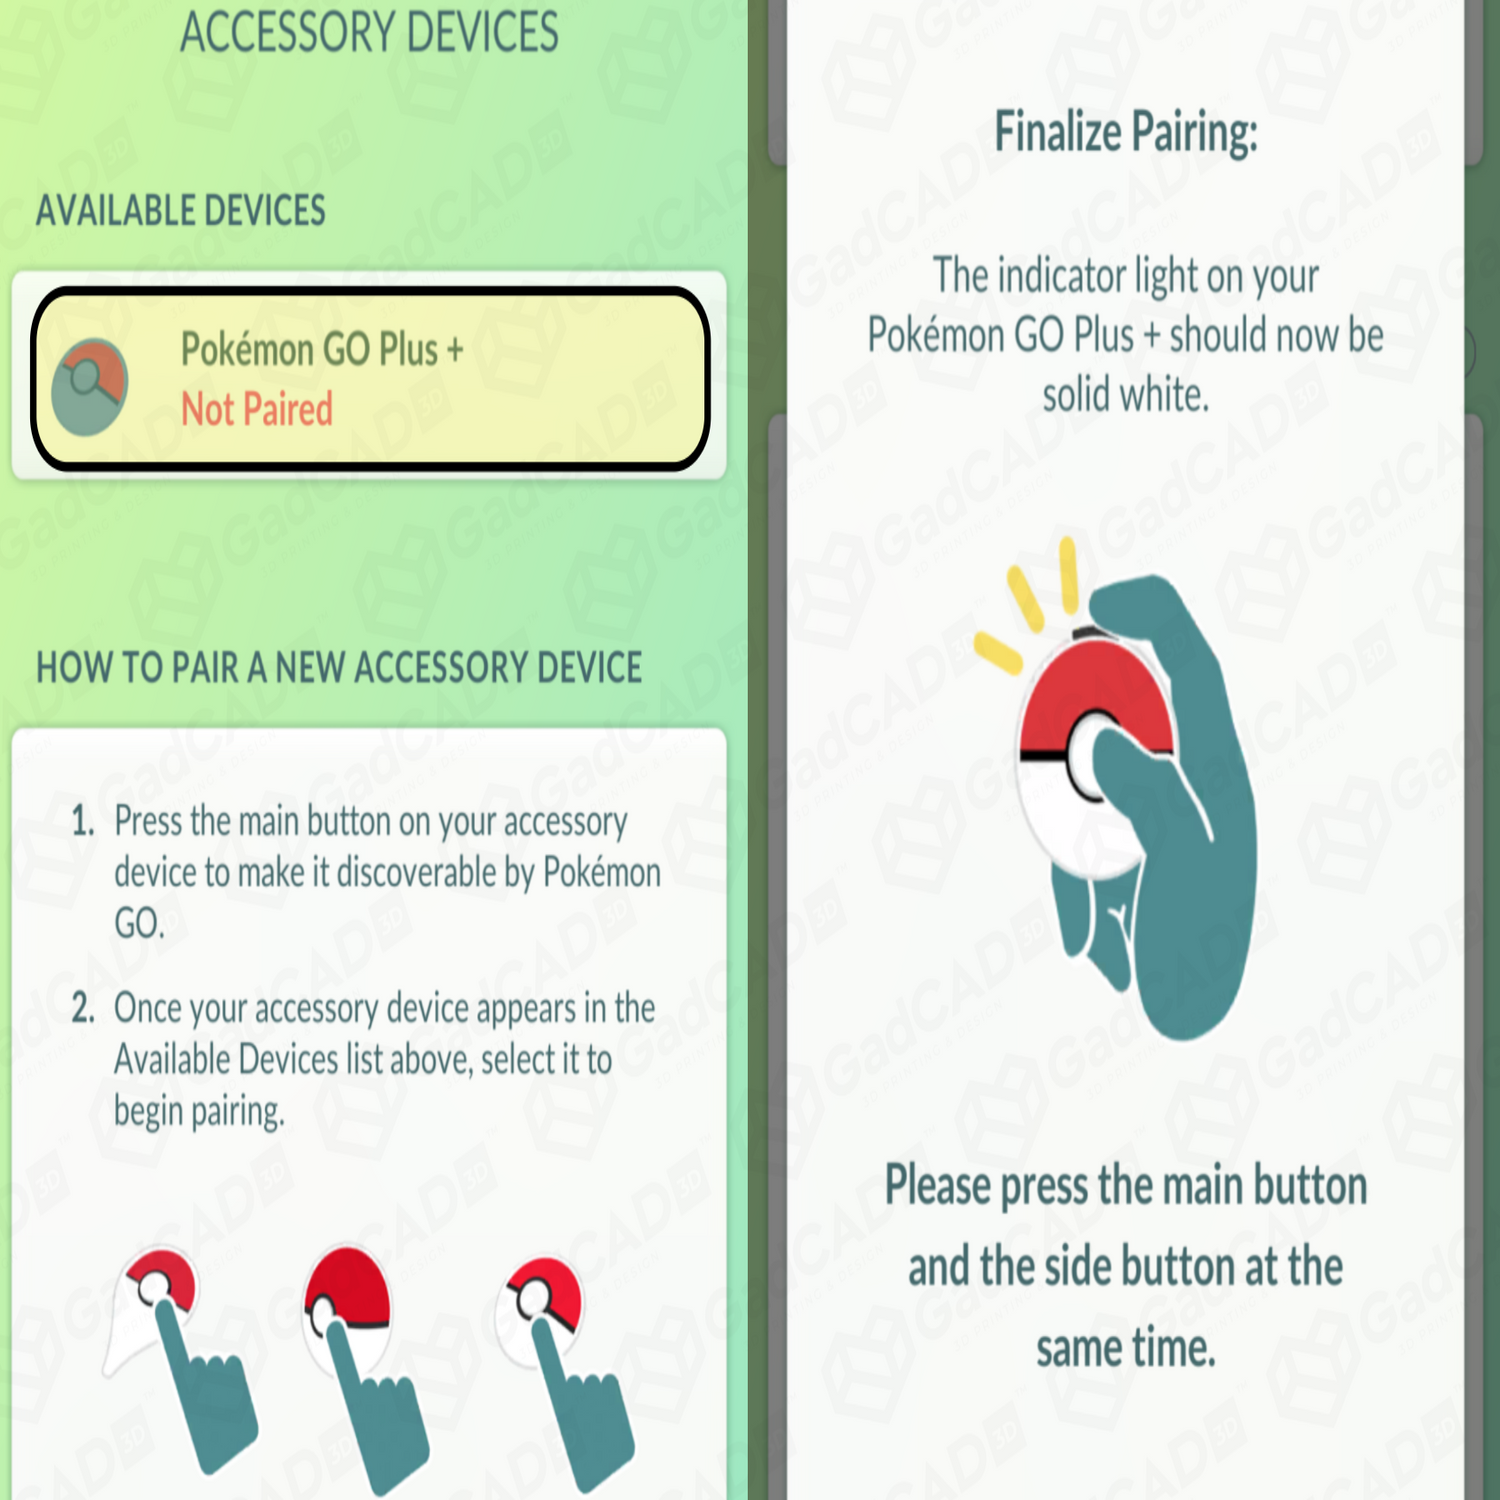
Step 3:
Pair your device.
Ensure the ULTRA MOD switch is set to MANUAL (Red) for pairing!
Press the ULTRA MOD's Main Button, then select the option that appears under "Available Devices" in the app. When prompted, press the Main & Side Buttons together to complete the pairing.
Enable Custom Auto-Throws
Configure your Accessory Device Settings to allow the ULTRA MOD to use Great/Ultra balls.
Collapsible content
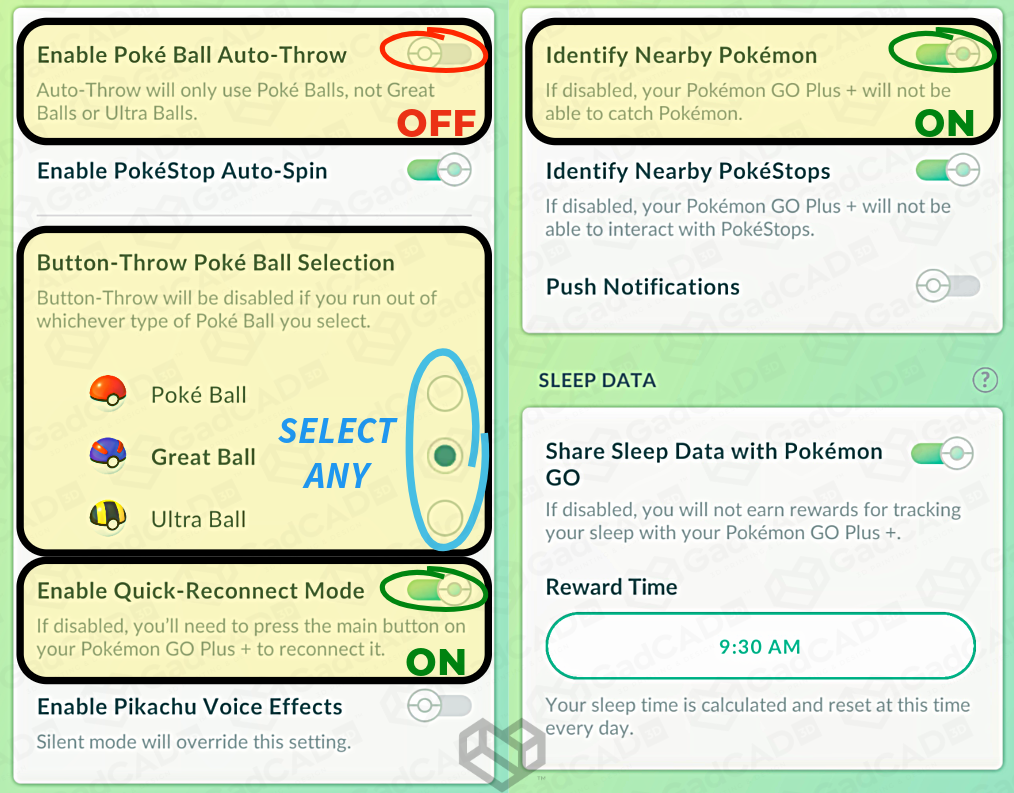
1. Turn OFF "Enable Poké Ball Auto-Throw"
This is required for the ULTRA MOD to work! Otherwise, your device will only auto-throw the standard Poké Balls.
2. Choose "Button-Throw Poké Ball Selection"
These are what your ULTRA MOD will auto-throw!
Auto-throw attempts will fail if:
- You are out of the selected ball type.
- Your Pokémon storage is full.
3. Turn ON "Identify Nearby Pokémon"
If you only want to auto-spin Poké stops, turn this off.
This setting can be useful during Daily Incense walks in case you encounter a Legendary Galarian Bird!
4. Turn ON "Enable Quick-Reconnect Mode"
Highly recommended, but not required.
All auto-catchers automatically disconnect from the app after one hour. Enable this setting to reconnect it with a single tap in-game!
5. Set the ULTRA MOD Switch to AUTO (Green)
If all other settings are correctly configured, your ULTRA MOD will start auto-throwing your selected ball type! Happy hunting!
Tip: To minimize idle battery drain, we recommend switching back to MANUAL if you aren't using the device for long periods.
Sleep-Tracking
Record your sleep to earn daily in-game rewards!
Collapsible content
1. Disconnect from Pokémon GO
Sleep tracking cannot start while the device is actively connected to the app!
2. Set the ULTRA MOD Switch to MANUAL (Red)
Otherwise, the device will loop itself in and out of sleep-tracking (cycling between a long blue flashes and short red pulses).
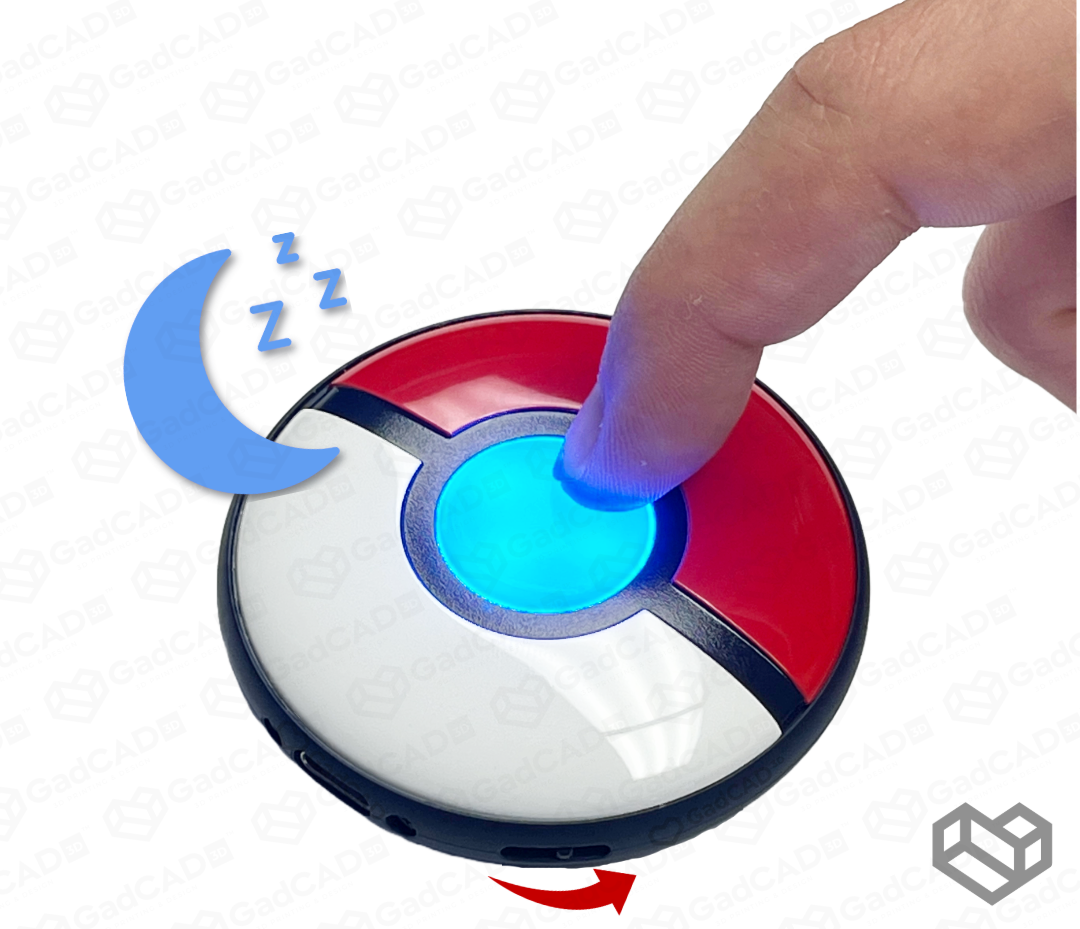
3. With the device flat, hold the Main Button for ~2 seconds
A long blue flash means sleep-tracking has begun! Sweet dreams!
Short red pulse means either:
- The device is not laying flat.
- Tracking ended with <90 minutes of logged activity.
4. Track your sleep for at least 90 minutes
Log at least 7 hours of sleep each day to maximize your daily in-game rewards!
Note: The time logged across multiple sessions will add-up that day's rewards. Only ONE sleep session (>90 minutes) will count toward the "Catching Some Z's" Special Research per day.
5. Hold the Main Button to end the session
"Catching Some Z's" Special Research should appear immediately, but your daily sleep rewards will only dispense after the time you configure in the Accessory Device Settings.
You will only earn one daily sleep reward each day.
6. Reconnect to Pokémon GO to log your session!
Sleep rewards appear after the configured time in your Accessory Device settings.
You can only earn one sleep reward per day, so try setting this later than you typically wake up! Connecting your device after this time will count the logged session(s) toward the next day.
FAQs
Find answers and troubleshoot common issues you may encounter.
Collapsible content
How to Factory Reset your device.
Performing a Factory Reset resolves >90% of the issues your GO Plus + can face.
To perform a Factory Reset:
- Ensure your device is charged and the ULTRA MOD Switch is set to MANUAL (red).
- Press and hold the Side Button and Reset Button for at least 5 seconds.
- Navigate to Accessory Device Settings and press the "eject" button.
- Follow the First-Time Pairing steps to reconnect your device.
HELP! My device randomly stopped working/charging!
First, don't panic! (Second, that's not a question.)
This happens when the device's firmware randomly locks up and can be easily fixed with a Factory Reset (see top item ).
If that still does not help, please contact us for additional assistance.
Why is my device only throwing standard Poké Balls?
This will only happen for one of two reasons:
- The "Enable Poké Ball Auto-Throw" setting is ON (set it to OFF instead)
- The standard Poke Ball is selected under "Button-Throw Poké Ball Selection"
Why does the Main Button flash Blue/Red when disconnected?
Don't worry- you're not under arrest.
This is normal and not a fault with your device. The flashing happens when the ULTRA MOD switch is set to AUTO (Green) while disconnected from Pokémon GO.
To stop the flashing, set the ULTRA MOD Switch to MANUAL (Red) while disconnected from the game.
"Why?" The ULTRA MOD works by rerouting signals originally sent to the vibration over to the Main Button to automatically throw Great and Ultra Balls. However, when disconnected from the game, the device interprets the signal as the user wanting to start/stop sleep-tracking, creating in a behavioral loop.
How do I unlock the "Nightcap Snorlax" Special Research?
The "Catching Some Z's" Special Research will automatically unlock the first time you connect a Pokémon GO Plus + to your account. If it does not immediately appear, try restarting your app.
You'll need to track your sleep each day for several weeks to unlock every encounter.
Note: The Special Research is only unlocked once per account. It is permanent and will not disappear until you complete it. Pairing a new GO Plus + to your account will NOT unlock the research a second time.
Will resetting my device impact the Special Research?
No. The "Catching some Z's" Special Research permanently unlocks when you first connect a GO Plus + device to your account. You can continue tracking your sleep each day and progressing through the objectives after resetting your device. The ULTRA MOD will not negatively impact your sleep-tracking in any way.
Note: You can only unlock/complete the special research once per account.
Why is the Side Button blinking red?
The flashing red light means the battery level is critical and needs to charge. A flashing red light means the battery is too low to operate and needs time to charge (usually 15~20 minutes).
ULTRA MODs usually ship with minimal charge for safety. If you just received your device, plug it in and let it charge for at least 20 minutes to charge before use. Once the battery indicator turns a solid orange, the device has enough battery to start using. A full charge can take 2~3 hours.
Can I undo the LED dimming?
For devices purchased 2023-2024, NO. Attempting to do so can permanently damage the LEDs and will void your warranty.
For devices purchased after 2025, YES. However, this should only be attempted at your own risk if you are comfortable handling small electronics. Please contact us for guidance.
Why does the Side Button not respond when pressed yet glows while charging?
Please first confirm that your device is sufficiently charged.
In some rare cases, the internal battery wires and/or side button spring can dislodge during shipping and cause interference with the external button. Please contact us for assistance in resolving this issue. We'll be happy to guide your through opening your device and reseating the components or, alternatively, coordinating an exchange.
Why does the Main Button feel stiffer on the Dim version?
You can typically solve this by firmly pressing the Main Button down with your thumb and "massaging" it in a circular motion. This helps to reseat the internal silicone cover that sits between the external button and internal shroud.
"Why?" For devices purchased between 2023-2024, a 3D-printed shroud was placed over the LEDs to reduce their brightness. In some cases, the device can get shaken around during shipping (or extreme Pokémon GO sessions) and cause some of the internal components to misalign. Simply reseating everything with a bit of pressure solves the issue almost every time.
Devices purchased from 2025 onward use a new vinyl shroud that is heat-pressed onto the device and provides a much more precise fit, eliminating this issue.
Please contact us if you still have trouble with the Main Button being too stiff to use.
My question/problem isn't listed here.
Please contact us for help! To help us locate your order, please message us on the platform where you purchased the ULTRA MOD from. Otherwise, please email us at support@gadcad3d.com with your order number.
The fine prints
Collapsible content
Limited Warranty (30 Days)
We at GadCAD 3D stand by our work, including all ULTRA MOD devices purchased through our sales channels. If anything does not work as advertised within 30 days of receipt, we'll make it right.
This warranty covers necessary exchanges/repairs caused by production defects. It does NOT cover any form of user damage, misuse, elective returns, or circumstances beyond GadCAD 3D's control, such as game updates that may affect the functionality of the device. To qualify for an exchange, the device must be returned in its original condition and not show signs of improper use or physical/water damage. Defective units must be received by GadCAD 3D before a replacement is sent unless stated otherwise. Returns will only be accepted in the context of prorated exchanges, where a separate unit is purchased to replace a defective one, which will be refunded upon receipt and inspection. Returns of devices showing reasonable signs of improper use, physical damage, or unauthorized tampering will not be honored under this warranty. GadCAD 3D is solely responsible for determining whether these defects are due to these factors or craftsmanship. Additionally, if an issue is found to result from damage or misuse, the customer may be responsible for return shipping postage or other applicable fees.
Disclaimers
We strongly advise thoroughly reading the original manufacturer's operation manual for complete safety warnings and device operation details before use. GadCAD 3D is an independent operation based in Texas and is NOT affiliated with, endorsed by, or authorized by The Pokémon Company (comprised of Nintendo, Inc., GAME FREAK, Inc., and Creatures, Inc.) Niantic, Inc., nor any of their subsidiaries or affiliates. All product names, logos, and brands mentioned are the property of their respective owners and are used solely for identification purposes.
GadCAD 3D's Unofficial ULTRA MOD for the Pokémon GO Plus+ (henceforth "this service") is designed to automate pre-existing functions of the retail Pokémon GO Plus+ device, such as pressing the button to auto-throw Great or Ultra Balls, which typically require manual operation. This change results from independent innovation and is neither approved nor endorsed by the original manufacturers nor the game's publishers. Utilization of this service is at the user's own discretion and risk. Customers who purchase and/or any individuals who use this service accept that GadCAD 3D shall not be liable for any direct, indirect, incidental, or consequential damages or losses that may occur, nor for any actions that may be taken against the user's gaming account in parallel with its use.
GadCAD 3D shall not be held liable for any compatibility issues that may arise post-purchase. GadCAD 3D does not provide software updates or guarantee ongoing compatibility of the modified devices with mobile phones, operating systems, or the Pokémon GO application. The user is responsible for verifying the compatibility of the Pokémon GO Plus+ with their mobile devices, operating systems, and app versions by referring to the original manufacturer’s specifications and requirements before purchase.